Student Rigging Work

General / 02 February 2021

Ciao!

I'd like to share some rigging research I did during my 3rd year of studying game development.
We were working on a year-long game project that would later turn into Muscle Magic! At the time, we were doing all sorts of research. I was curious if there was a feasible way to add squash & stretch to our rigs, with volume retention, and have it working in Unreal. I figured out a way to do it, so I hope I can help someone with their project by sharing it :)


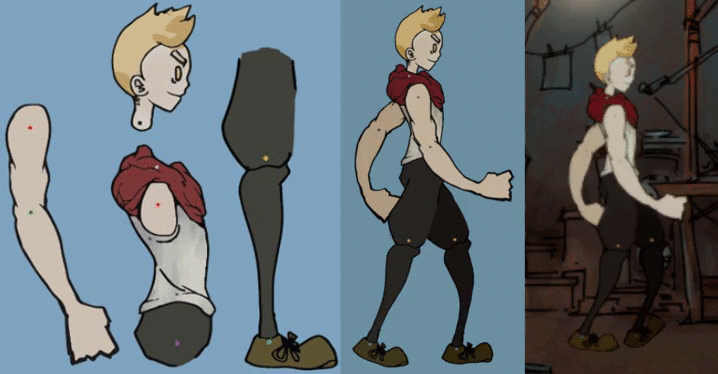
This is the character that I created to test out the workflow. Very basic, I just wanted to test if the squash & stretch would work, and how to apply it to a spine as well as an IK chain. Also, he reminds me of Baymax, which is a big bonus in my opinion. 

I built it so that all limbs (and the torso) have 2 joint chains in them. 1 regular one, to drive the rig as you would expect it, and 1 to scale the geometry for volume retention. The chains for scaling have about 8 joints each, and I added an IK spline handle to drive it. I skinned the IK spline curve to the regular joint chain, as well as the geometry of the character to the scaling chain. Then to add the volume retention to the regular joint chain, I dived into the Node Editor. I used a curveInfo node to get the worldSpace from the IK spline curve. Then I divided the arcLength from the curveInfo node by the scale X from each joint in the chain. Now I could add an attribute to the joints to control how much it should squash/stretch, and connect those to the scale Y and scale Z of the joints.


I also still had to figure out how to allow an IK chain to stretch further than its usual limit. I created a Distance Tool on the chain, parented the first locator of the Distance Tool to the first joint in the chain, and the second locator to the curve controlling the IK. I took the distance from the tool, divided it by itself, ran it through a condition node, and (if it was greater than the default stretched position) fed it to the scale X on the joints.

Then to export it to Unreal, I parented all joints to one ROOT joint that is positioned (0,0,0). The key to make it work, was that all meshes were parented to the torso, and the ROOT joint and the meshes had to be in the same hierarchy in the Outliner (so the joints aren’t grouped for example). I used the Game Exporter, selected both the ROOT joint and the Torso mesh and exported it. Then I could import it into Unreal, and walk around with my little squashy Baymax knock-off!


I mostly used these tutorials, you can check them out as well:

Maya Rigging Tutorial - Squash and Stretch Math Rigging Done The Right Way HD
Tutorial: Stretchy IK arm in Maya
Creating a Character Rig - Part 23: Stretch IK/FK arms
Building a Stretchy IK Chain in Maya

And if you are interested, feel free to reach out and I can share a document that I made at the time, which goes more in-depth through every step to set up this way of squash & stretch rigging. I'm als very curious if anyone knows any better ways to do it!

Thanks for reading!

Report

2D Character Rigging

General / 20 March 2020

Hello!

I hope everyone is doing okay.
I decided to take some time to elaborate on how I rigged the characters for my 2nd year student game project, Canine 49. Our main inspiration for the animation style was the game Night In The Woods. It has a very flexible, almost rubber hose feel to it. To attain this effect, I decided to rig our characters in Adobe After Effects, combined with the Duik rigging and animation plug-in. To test out the pipeline from character creation all the way to animation, I made 2 walk cycles:


Everything worked very well. The process was quick, it didn't look rigid, and my team agreed it fit the style of our game. Next, I had to test out whether the same workflow fit the characters that our character artist would be designing. He illustrated an early version of the main character of our game. I rigged it, created another walk cycle and exported it to the game engine. And again, everything worked.


So, the process of creating these rigs is mostly based off this tutorial: Summit 41 - Adv. Character Rigging - After Effects. First, I pinned the separate illustration layers in the necessary pivot points using After Effects' built-in Legacy Puppet tool. I then used Duik to create bones from those pins, which I could use to create IK constraints and controllers. These controllers allowed for easy animation and clean files. We keyed the translation, rotation and scale of these controllers, tweaked the animation curves in the graph editor, and exported our animations as sprite sheets to the game engine. Below you can see how I received the illustration of the main character of our game, and the entire process of how I rigged him.


I had to add and tweak some processes though, to make it suitable for our game. Most notably, I added an easy way to use replacement animation (toggling between different illustrations for different hand gestures, blinks, etc.), and I found a way of driving multiple bones with one controller. The latter is most apparent in the dog rig. Each bolt at the base of its neck has its own bone, which allows the neck to rotate and scale correctly. Below is another process video of me rigging the robot dog. This was one of the most complex rigs of the project, because of the many bones, facial controls and flexible IK tail.


An important thing to note though, is that this workflow mainly works well for short animations, like game cycles. I used this method in a later project, which was a 4 minute long music video. Even though I divided the project into separate compositions, the software was running very slowly by the end of production.

I hope this was an interesting read, let me know if you have any remarks or questions!
Report

Character Designs

General / 28 February 2020

Hi!

I thought this would be a good place to share some things I'm trying out and learning about, starting with my first (and brief) encounter with character design. I created these characters for a 2 week game project for school 2 years ago. The theme was "evil music symbols" - 10 points to anyone that can spot all of the music references in the designs.

I learned a lot from this project and explored a lot of new things. I worked for the first time in Adobe Illustrator to create the characters. I tried out Spine to rig and animate them, and it was actually the very first time I tried 2D animation, as well as game animation. A lot of fond memories of this project and these characters :)


Report